GB/T 32027-2015 PDF EnglishUS$90.00 · In stock · Download in 9 seconds
GB/T 32027-2015: Footwear -- Resistance to crack initiation and growth -- Belt flex method Delivery: 9 seconds. True-PDF full-copy in English & invoice will be downloaded + auto-delivered via email. See step-by-step procedure Status: Valid
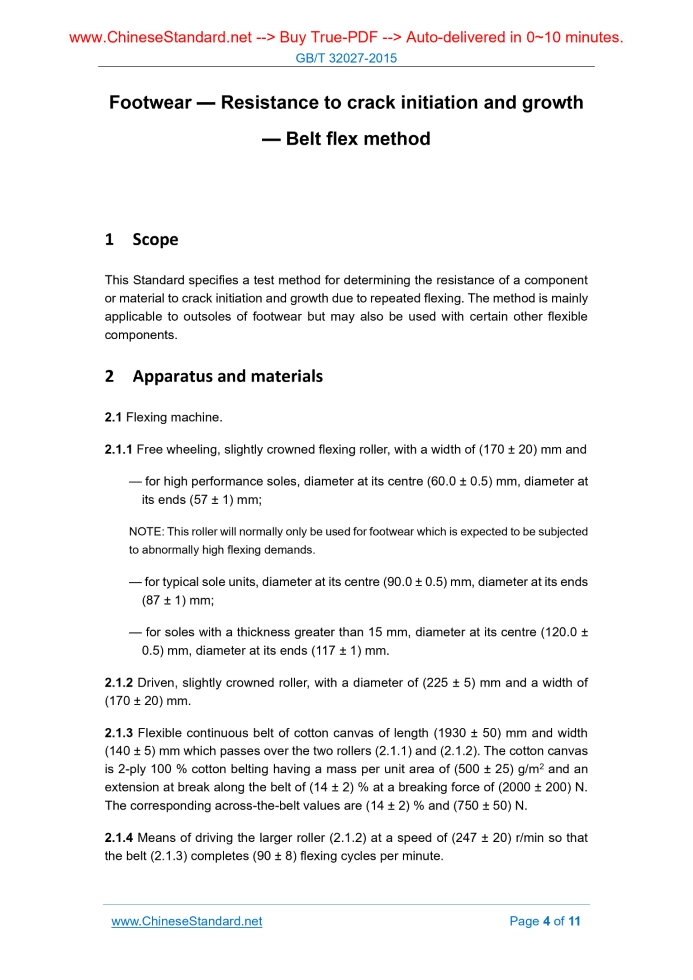
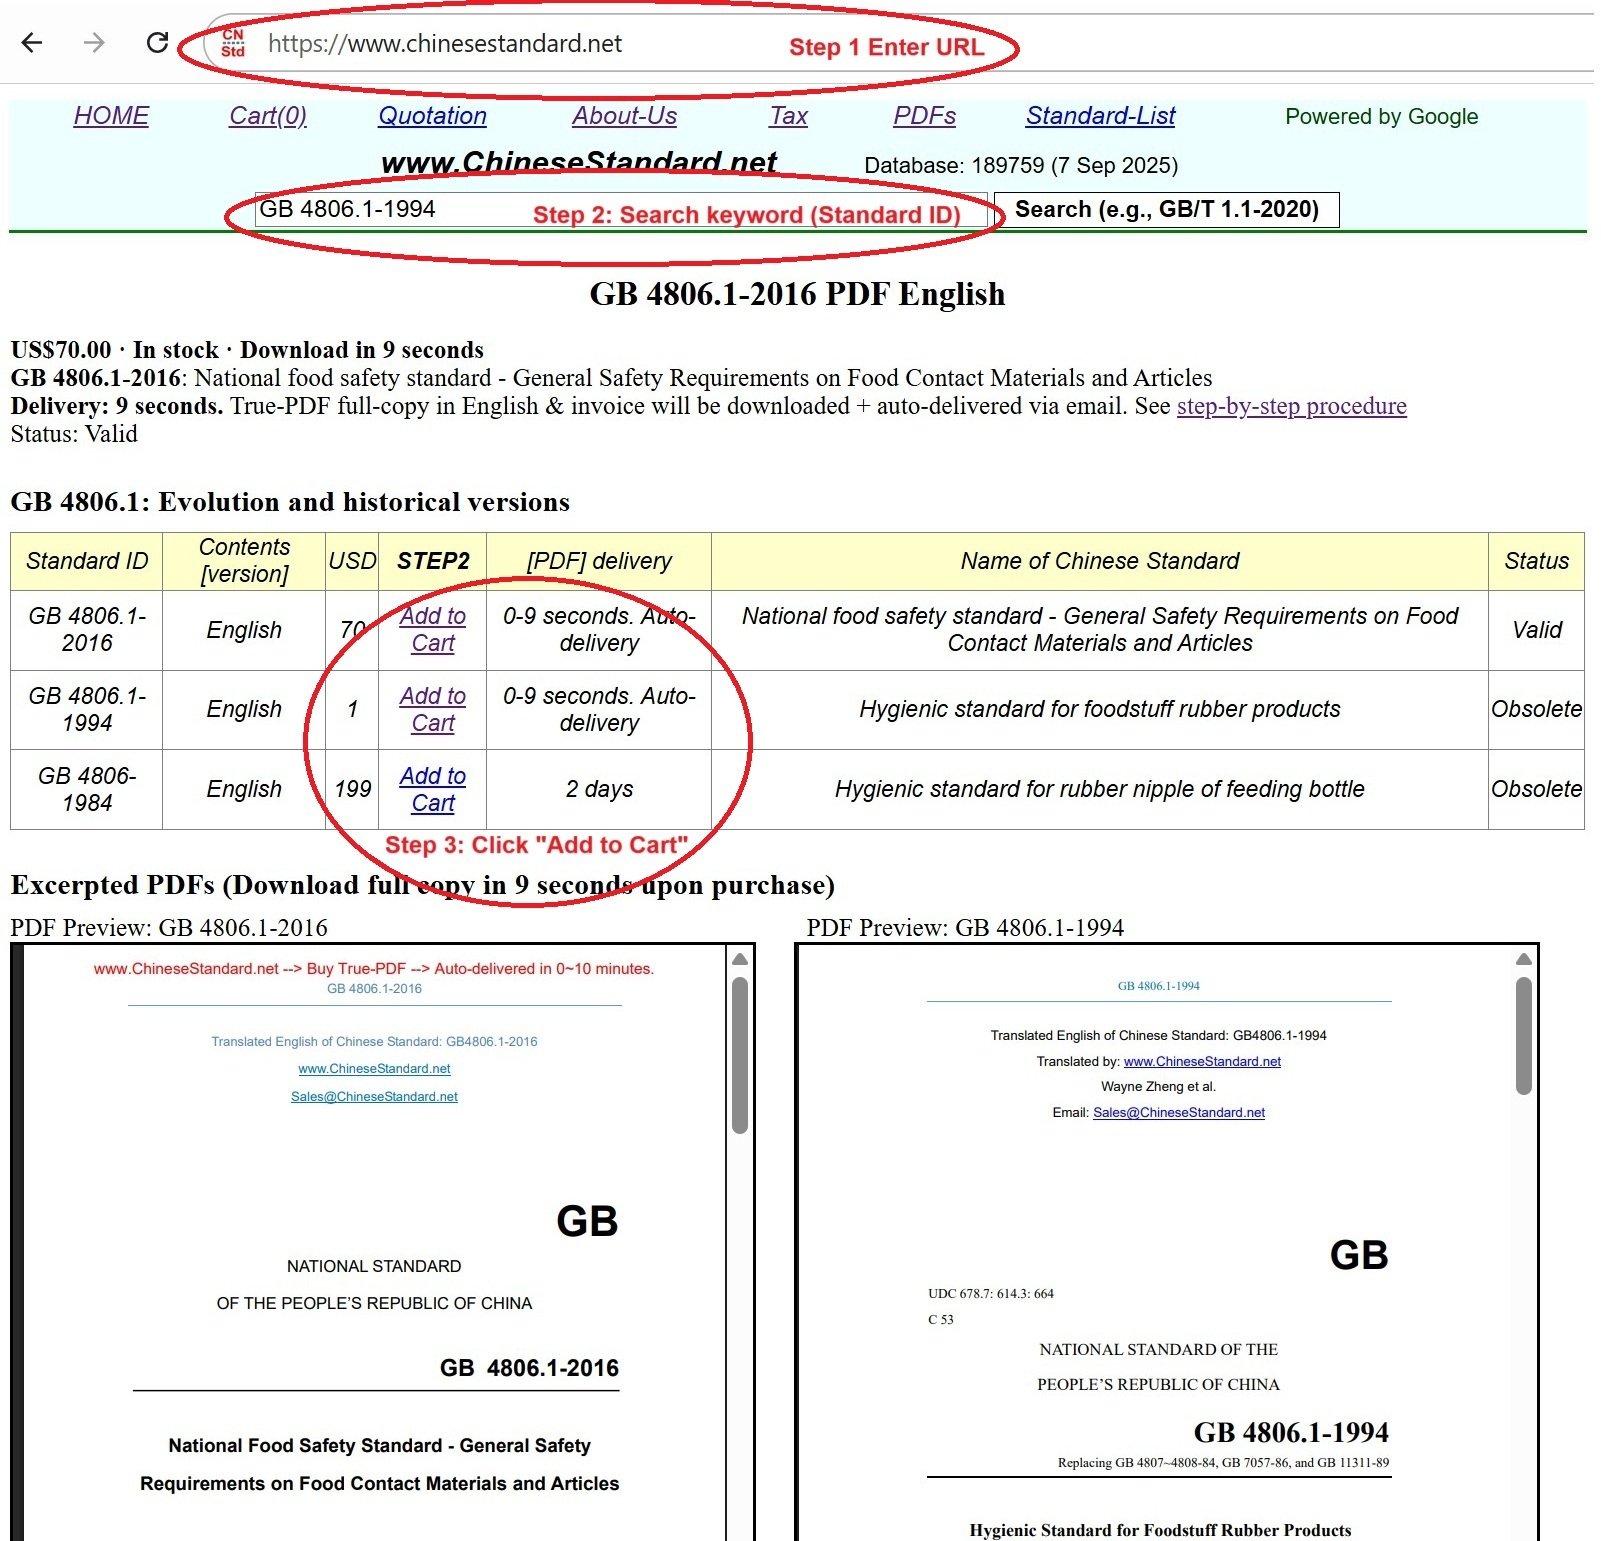
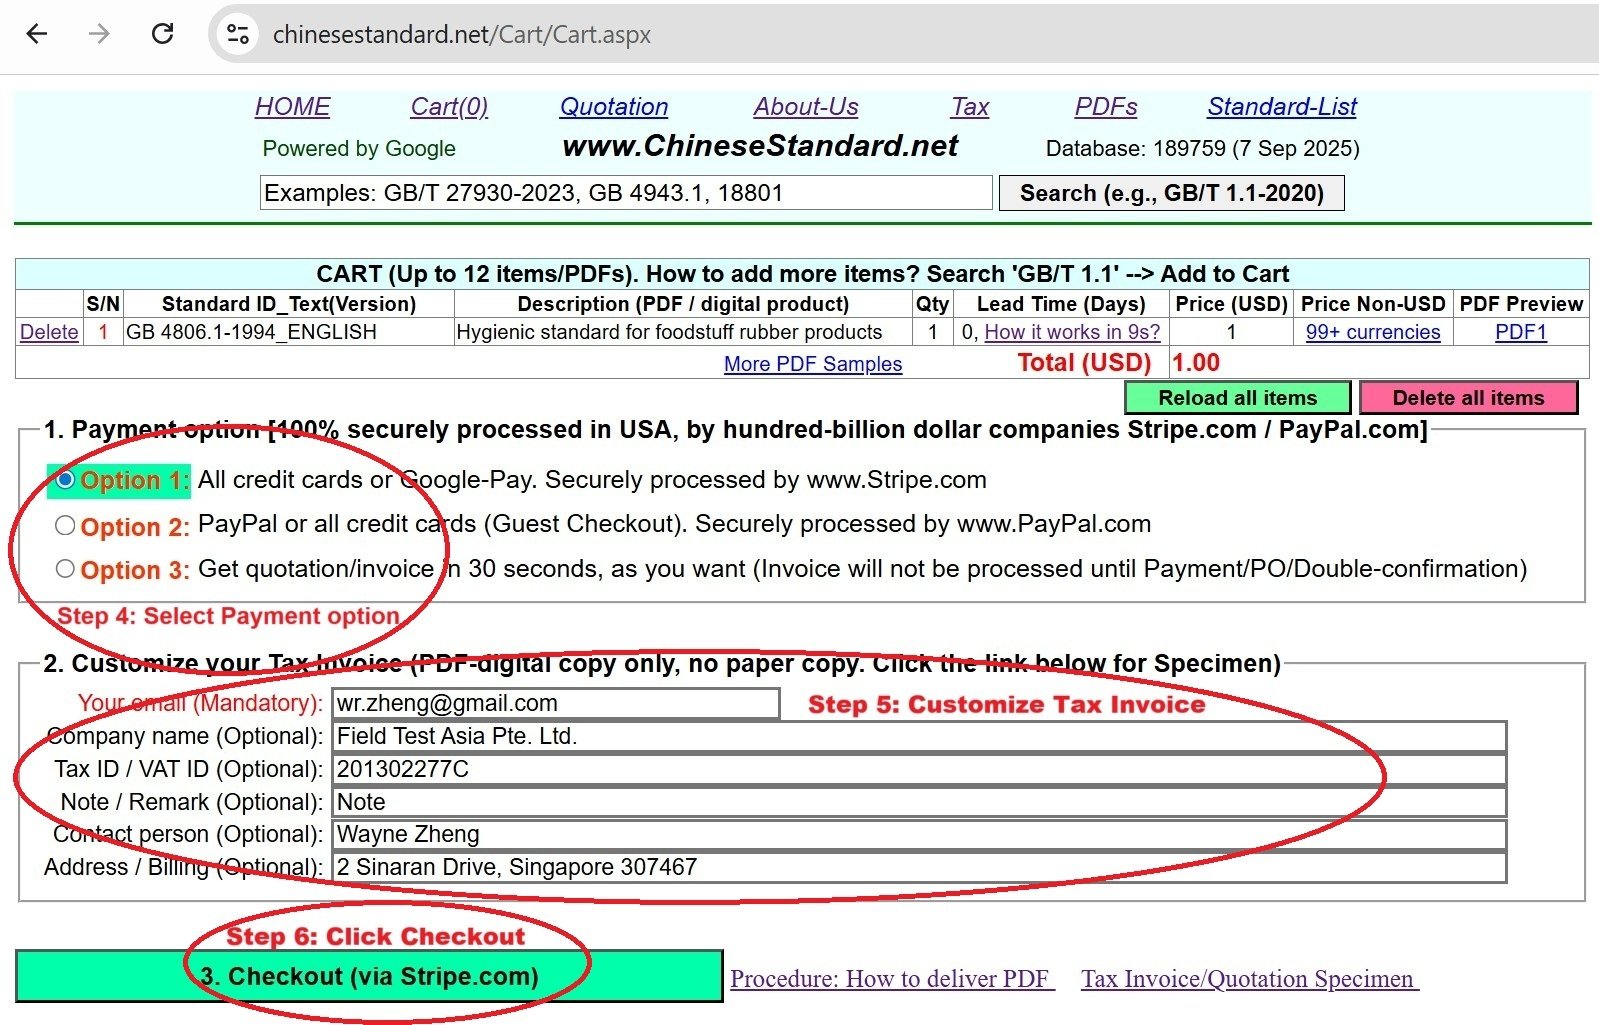
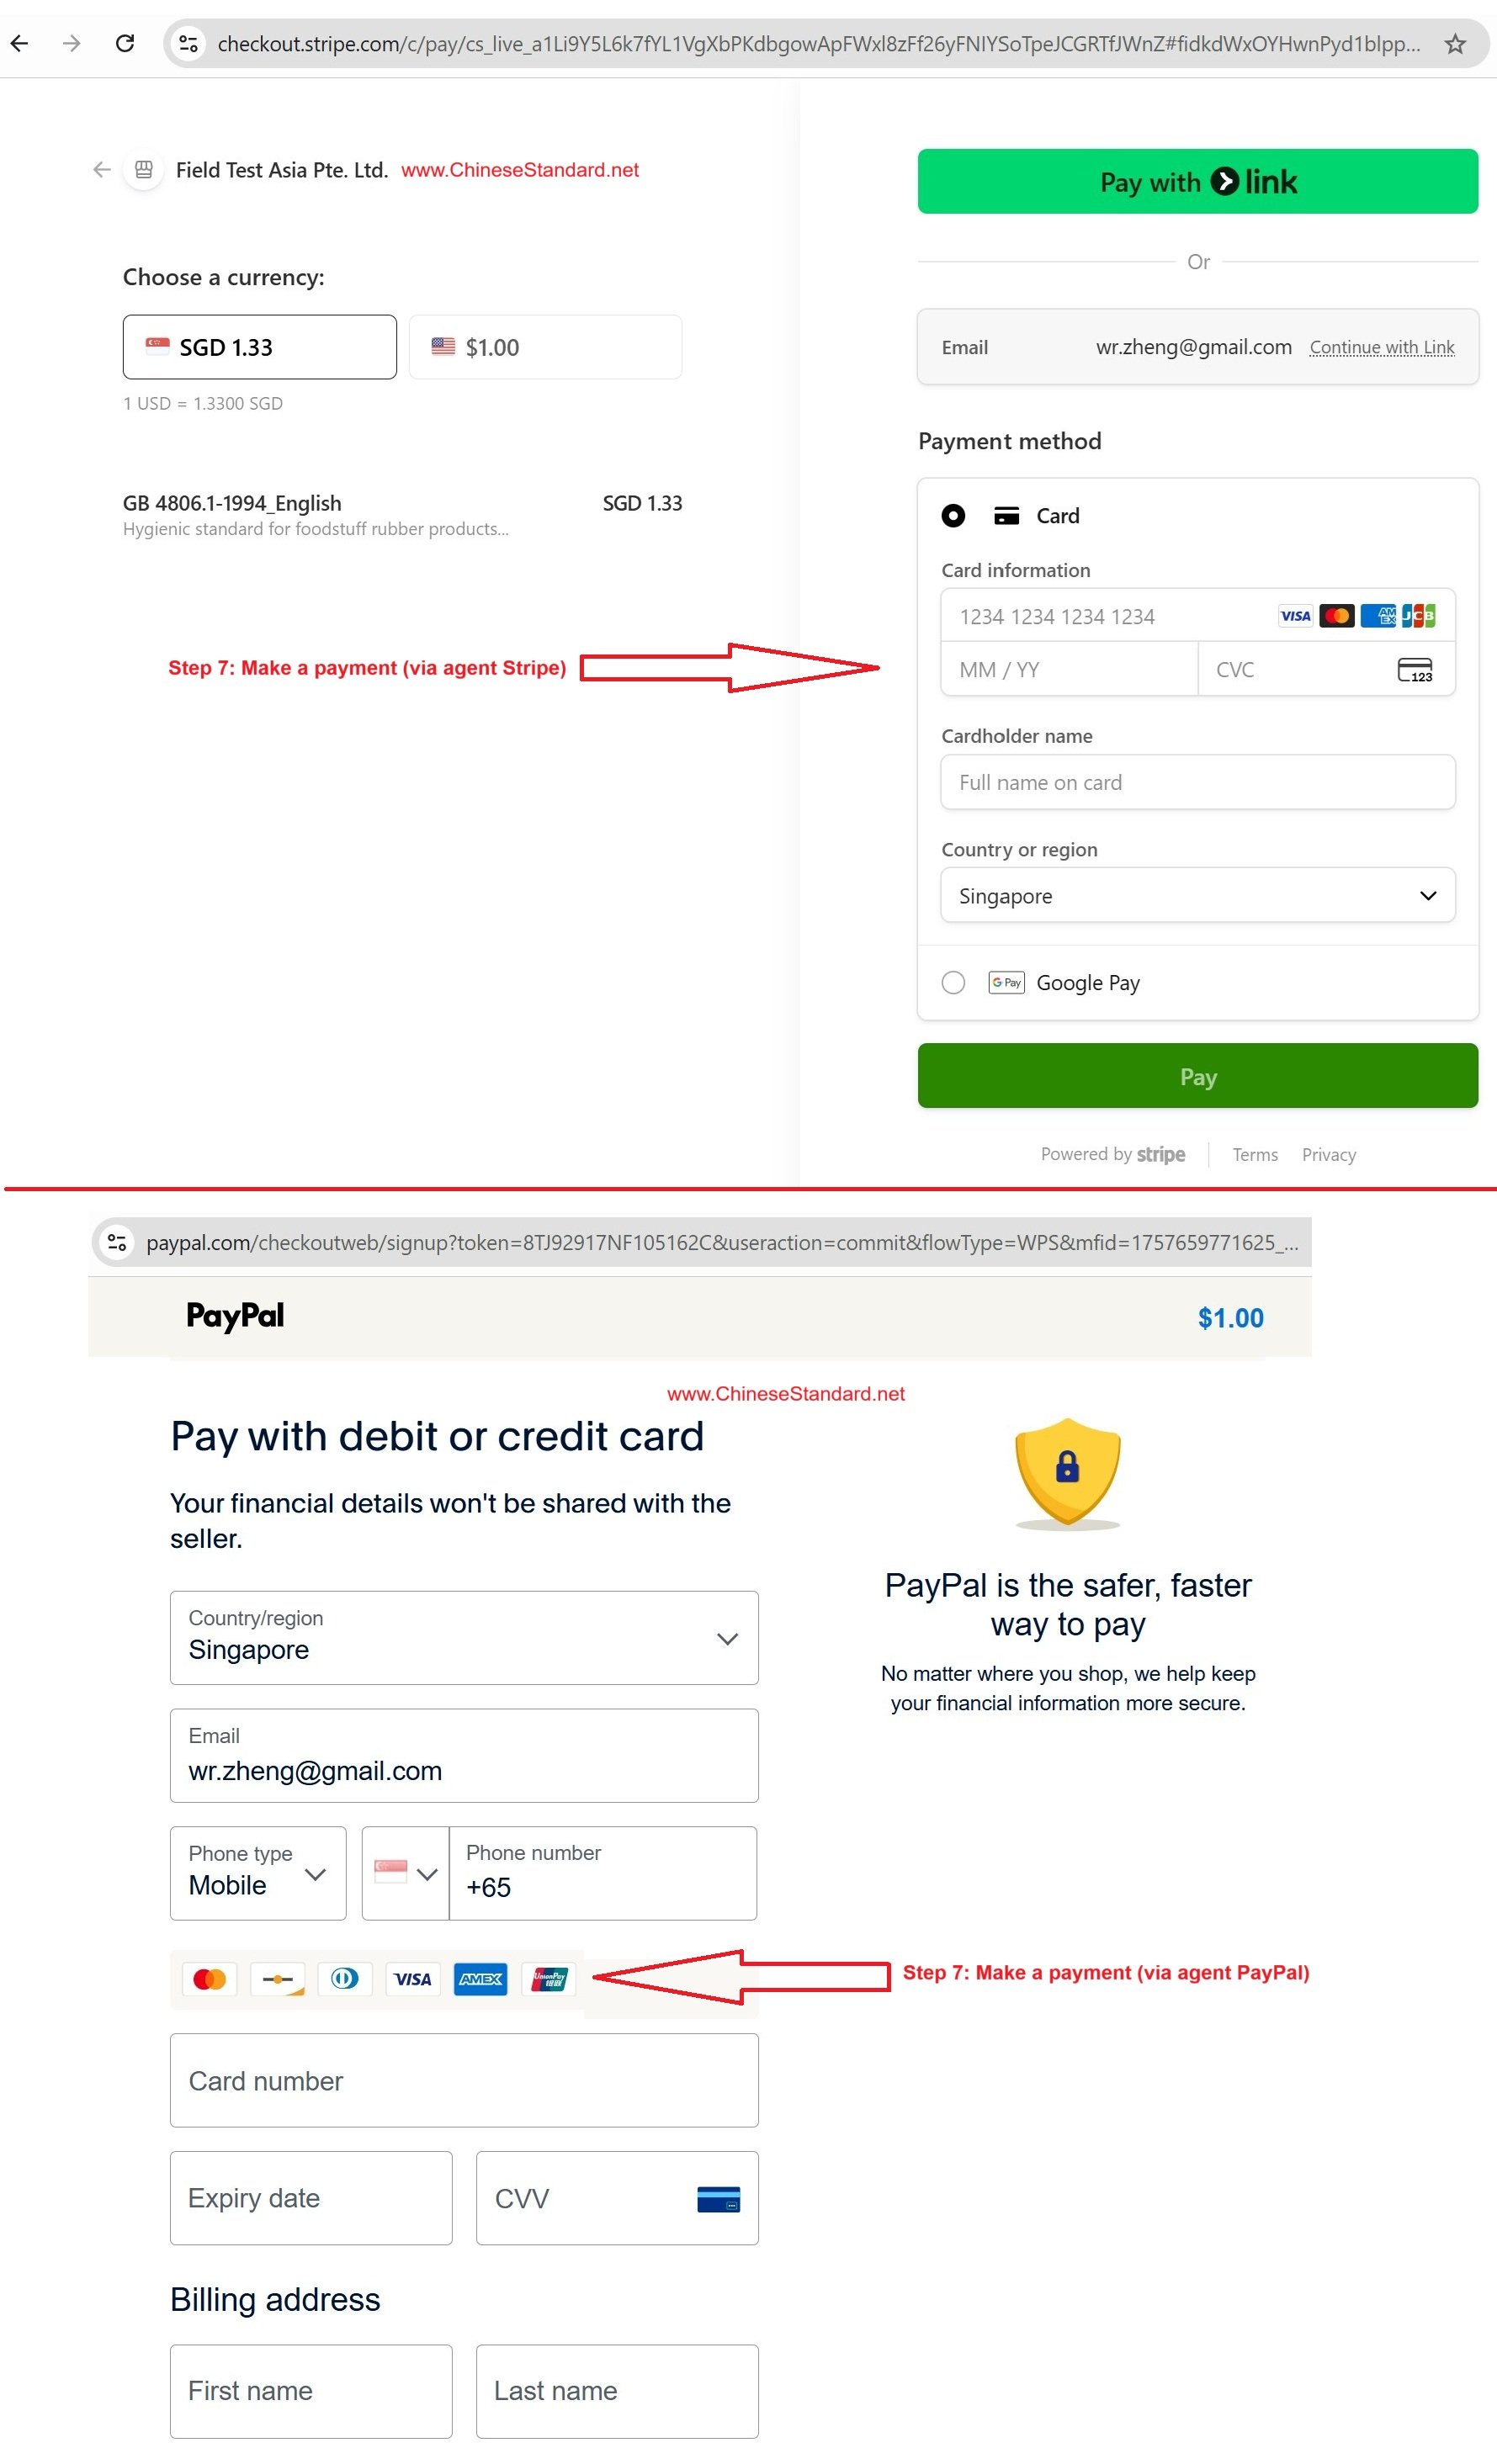
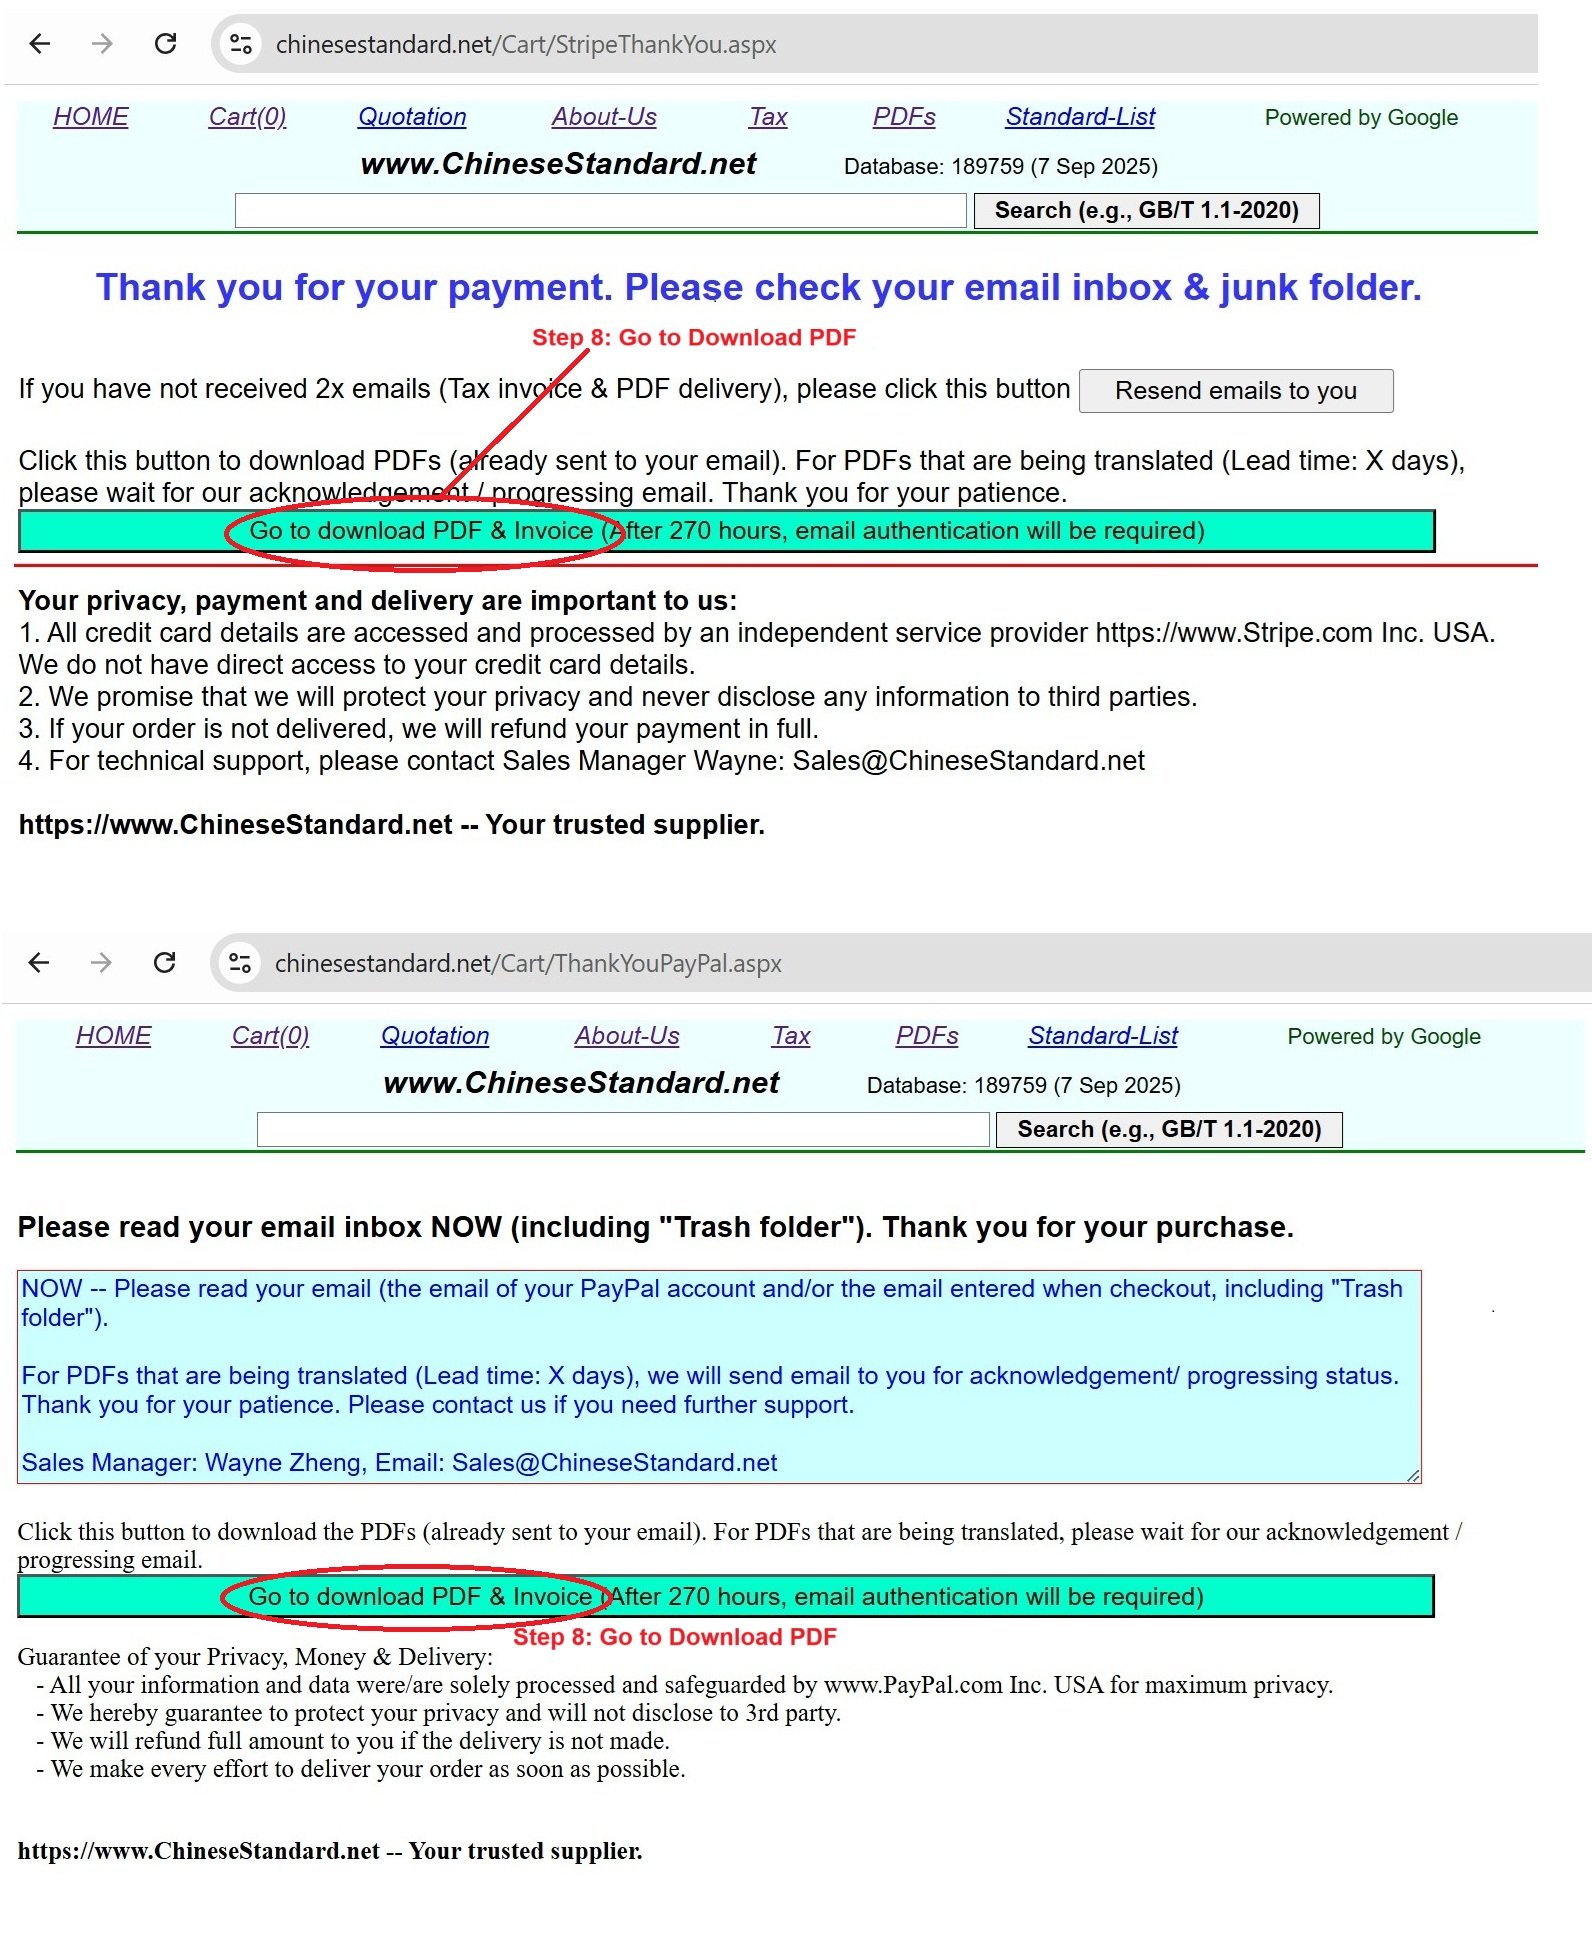
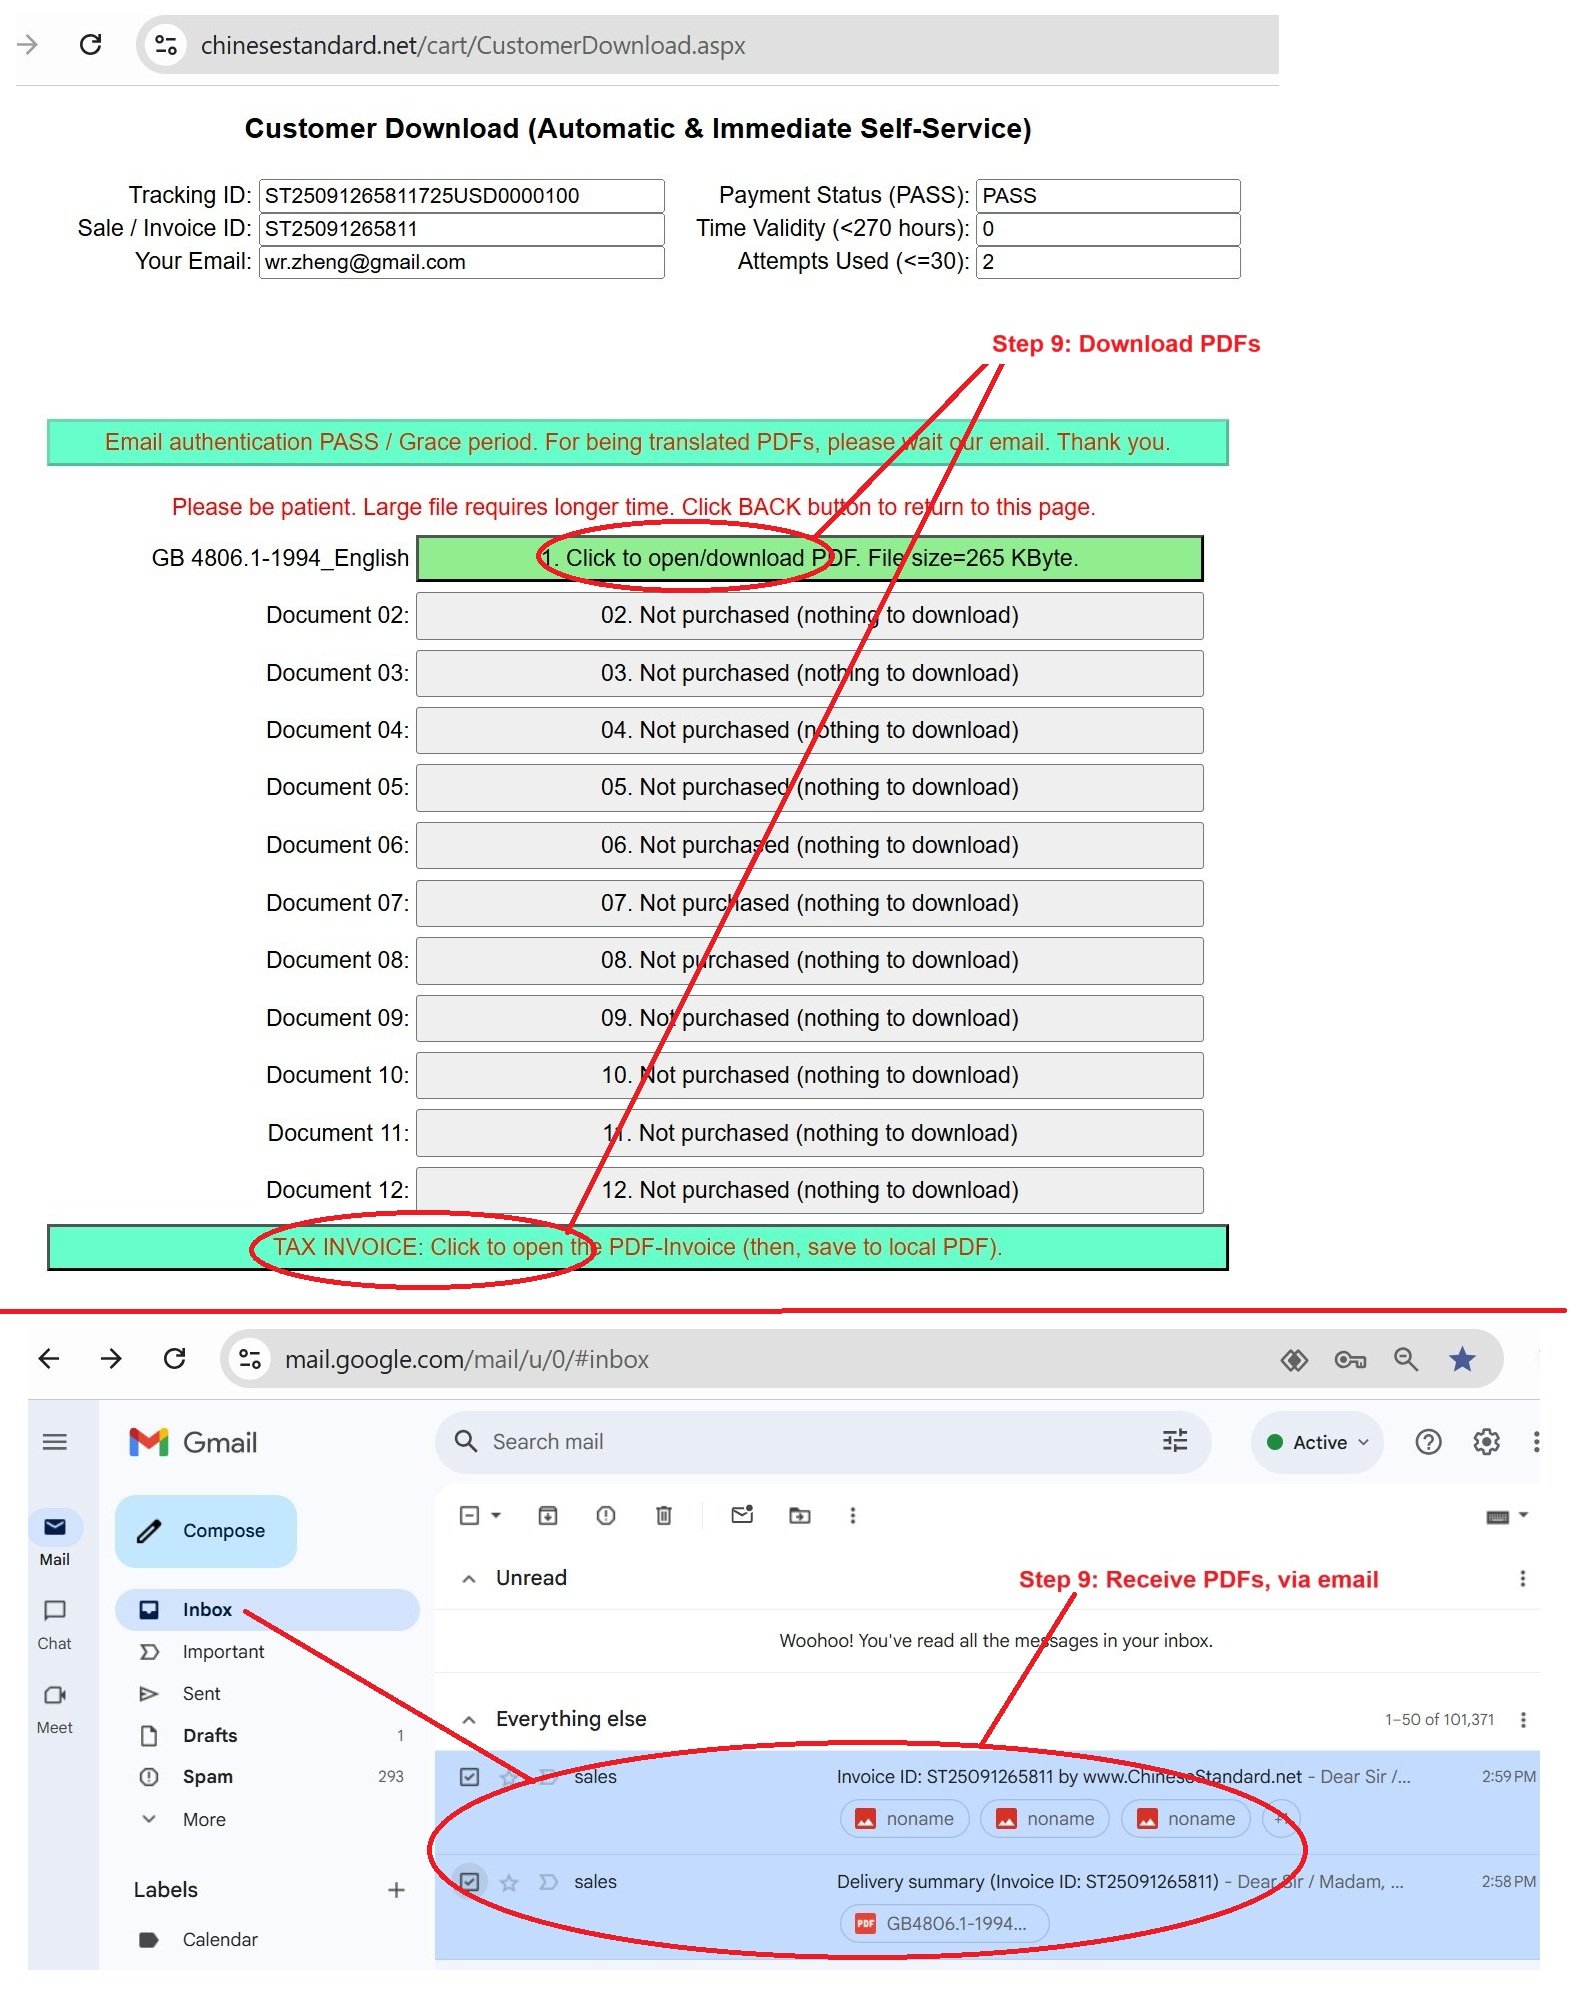
Similar standardsGB/T 32027-2015: Footwear -- Resistance to crack initiation and growth -- Belt flex method---This is an excerpt. Full copy of true-PDF in English version (including equations, symbols, images, flow-chart, tables, and figures etc.), auto-downloaded/delivered in 9 seconds, can be purchased online: https://www.ChineseStandard.net/PDF.aspx/GBT32027-2015GB NATIONAL STANDARD OF THE PEOPLE'S REPUBLIC OF CHINA ICS 61.060 Y 78 GB/T 32027-2015 / ISO 16177.2012 Footwear — Resistance to crack initiation and growth — Belt flex method (ISO 16177.2012, IDT) Issued on: SEPTEMBER 11, 2015 Implemented on: APRIL 1, 2016 Issued by. General Administration of Quality Supervision, Inspection and Quarantine of the People's Republic of China; Standardization Administration of the People's Republic of China. Table of ContentsForeword ... 3 1 Scope ... 4 2 Apparatus and materials ... 4 3 Principle ... 5 4 Preparation of test specimens ... 6 5 Procedure ... 7 6 Test report ... 11 Footwear — Resistance to crack initiation and growth — Belt flex method1 ScopeThis Standard specifies a test method for determining the resistance of a component or material to crack initiation and growth due to repeated flexing. The method is mainly applicable to outsoles of footwear but may also be used with certain other flexible components.2 Apparatus and materials2.1 Flexing machine. 2.1.1 Free wheeling, slightly crowned flexing roller, with a width of (170 ± 20) mm and — for high performance soles, diameter at its centre (60.0 ± 0.5) mm, diameter at its ends (57 ± 1) mm; NOTE. This roller will normally only be used for footwear which is expected to be subjected to abnormally high flexing demands. — for typical sole units, diameter at its centre (90.0 ± 0.5) mm, diameter at its ends (87 ± 1) mm; — for soles with a thickness greater than 15 mm, diameter at its centre (120.0 ± 0.5) mm, diameter at its ends (117 ± 1) mm. 2.1.2 Driven, slightly crowned roller, with a diameter of (225 ± 5) mm and a width of (170 ± 20) mm. 2.1.3 Flexible continuous belt of cotton canvas of length (1930 ± 50) mm and width (140 ± 5) mm which passes over the two rollers (2.1.1) and (2.1.2). The cotton canvas is 2-ply 100 % cotton belting having a mass per unit area of (500 ± 25) g/m2 and an extension at break along the belt of (14 ± 2) % at a breaking force of (2000 ± 200) N. The corresponding across-the-belt values are (14 ± 2) % and (750 ± 50) N. 2.1.4 Means of driving the larger roller (2.1.2) at a speed of (247 ± 20) r/min so that the belt (2.1.3) completes (90 ± 8) flexing cycles per minute. 4.3.4 Mark a line between the point at the heel and the point at the toe, XY in Figure 1. 4.4 Cut off the heel and part of the waist portion so as to leave 10 mm to 20 mm length of the waist on the forepart (see Figure 1). 4.5 If the edge of the forepart on the reverse side is cupped or includes any form of rand or imitation welt, scour this off until this surface is flat. Do not remove ribs in the central section of the outsole on the reverse side. 4.6 For outsoles which are thicker than 15 mm, reduce the thickness to 15 mm before preparation in order to ensure reasonable flexibility. In such cases, it will be necessary to use the 120 mm diameter flexing roller (2.1.1). Outsoles containing a metal insert are also tested using the 120 mm roller. NOTE. To help prevent thick soles peeling from the belt during the test, it is acceptable to taper the thickness at the extreme ends of the specimen (toe and waist) by scouring material away from the outside surface for a length of not more than 25 mm from each end, which will alleviate the flexing stress on the bond. 4.7 Prepare the reverse side of the forepart for bonding as follows. 4.7.1 Cellular polyurethane outsoles. lightly scour the whole of the surface. 4.7.2 Vulcanized and microcellular rubber. lightly scour the whole of the surface, then scrub it with a halogenation primer for rubber (2.7) using a stiff brush. Leave to dry for between 15 min and 8 h before applying any adhesive. 4.7.3 Thermoplastic rubber. lightly coat the whole of the reverse surface with a halogenation primer for rubber (2.7) using a soft brush. Leave to dry for between 30 min and 8 h before applying any adhesive. 4.7.4 Microcellular EVA. lightly scour the whole of the reverse surface, then coat it with an EVA primer (2.7) using a soft brush. Leave to dry for between 30 min and 8 h before applying any adhesive. 4.7.5 PVC and solid (thermoplastic) PU. wipe the whole of the reverse surface with butan-2-one (methyl ethyl ketone, MEK). Leave to dry for between 15 min and 1 h before applying any adhesive.5 Procedure5.1 In order to prepare the belt for test, proceed as follows. 5.1.1 Cut a strip of cotton canvas fabric (140 ± 5) mm × (2000 ± 20) mm, and mark its centre on both sides. Key. 1 - Adhesive applied to the same surface as line AB; 2 - Adhesive applied to the same surface as line XY. NOTE. AB and XY are on opposite surfaces. Figure 3 Diagram for placing the specimens on the belt 5.3 Mark the perimeter of each test specimen on the belt. 5.4 Apply the pre-reacted adhesive (2.2.1) to the surface of the belt over. — the whole area of each of the marked specimen positions; — the area between the lines (5.1.2) and the ends of the belt (on opposite surfaces at one end to the other). 5.5 Apply a coat of the PU adhesive (2.2.2) to. — the prepared surface of each test specimen; — the areas of the belt coated as described in 5.4; — leave to dry for about 15 min. 5.6 Use the heater (2.5) to heat the adhesive on one of the test specimens to a temperature of between 80 °C and 85 °C, as indicated by the crayon (2.6). At the same time, heat the corresponding area of the belt to be bonded to the same temperature. 5.7 Immediately position the test specimen on the corresponding warmed area of the belt so that the specimen is aligned with its previously drawn outline (5.3). Apply enough pressure by hand to bond the specimen to the belt. NOTE. This can be achieved by turning the belt over and applying localized pressure to the back of the belt by rubbing into the inside surface of the sole. A hand tool with a smooth-faced surface can aid this process. 5.8 Repeat the procedure described in 5.6 to 5.7 for any remaining test specimens. 5.9 Fold the belt so that the two ends are together and use the heater (2.5) to simultaneously heat the adhesive on both ends of the belt to a temperature of between 80 °C and 85 °C, as indicated by the crayon (2.6). 5.10 Apply enough pressure by hand to bond the belt together and complete the bonding by applying localized pressure. NOTE. Rubbing using a hand tool with a smooth-faced surface can aid this process. ......Source: Above contents are excerpted from the full-copy PDF -- translated/reviewed by: www.ChineseStandard.net / Wayne Zheng et al. Tips & Frequently Asked Questions:Question 1: How long will the true-PDF of English version of GB/T 32027-2015 be delivered?Answer: The full copy PDF of English version of GB/T 32027-2015 can be downloaded in 9 seconds, and it will also be emailed to you in 9 seconds (double mechanisms to ensure the delivery reliably), with PDF-invoice.Question 2: Can I share the purchased PDF of GB/T 32027-2015_English with my colleagues?Answer: Yes. The purchased PDF of GB/T 32027-2015_English will be deemed to be sold to your employer/organization who actually paid for it, including your colleagues and your employer's intranet.Question 3: Does the price include tax/VAT?Answer: Yes. Our tax invoice, downloaded/delivered in 9 seconds, includes all tax/VAT and complies with 100+ countries' tax regulations (tax exempted in 100+ countries) -- See Avoidance of Double Taxation Agreements (DTAs): List of DTAs signed between Singapore and 100+ countriesQuestion 4: Do you accept my currency other than USD?Answer: Yes. www.ChineseStandard.us -- GB/T 32027-2015 -- Click this link and select your country/currency to pay, the exact amount in your currency will be printed on the invoice. Full PDF will also be downloaded/emailed in 9 seconds.How to buy and download a true PDF of English version of GB/T 32027-2015?A step-by-step guide to download PDF of GB/T 32027-2015_EnglishStep 1: Visit website https://www.ChineseStandard.net (Pay in USD), or https://www.ChineseStandard.us (Pay in any currencies such as Euro, KRW, JPY, AUD).Step 2: Search keyword "GB/T 32027-2015". Step 3: Click "Add to Cart". If multiple PDFs are required, repeat steps 2 and 3 to add up to 12 PDFs to cart. Step 4: Select payment option (Via payment agents Stripe or PayPal). Step 5: Customize Tax Invoice -- Fill up your email etc. Step 6: Click "Checkout". Step 7: Make payment by credit card, PayPal, Google Pay etc. After the payment is completed and in 9 seconds, you will receive 2 emails attached with the purchased PDFs and PDF-invoice, respectively. Step 8: Optional -- Go to download PDF. Step 9: Optional -- Click Open/Download PDF to download PDFs and invoice. See screenshots for above steps: Steps 1~3 Steps 4~6 Step 7 Step 8 Step 9 |