GB/T 13298-2015 PDF EnglishUS$125.00 · In stock · Download in 9 seconds
GB/T 13298-2015: Inspection Methods of Microstructure for Metals Delivery: 9 seconds. True-PDF full-copy in English & invoice will be downloaded + auto-delivered via email. See step-by-step procedure Status: Valid GB/T 13298: Historical versions
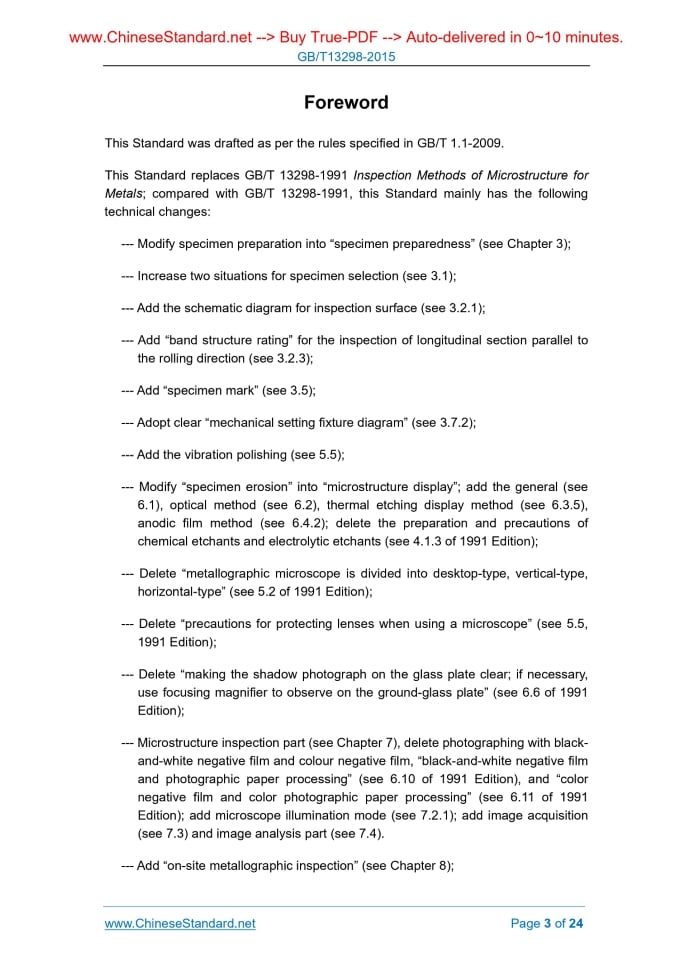
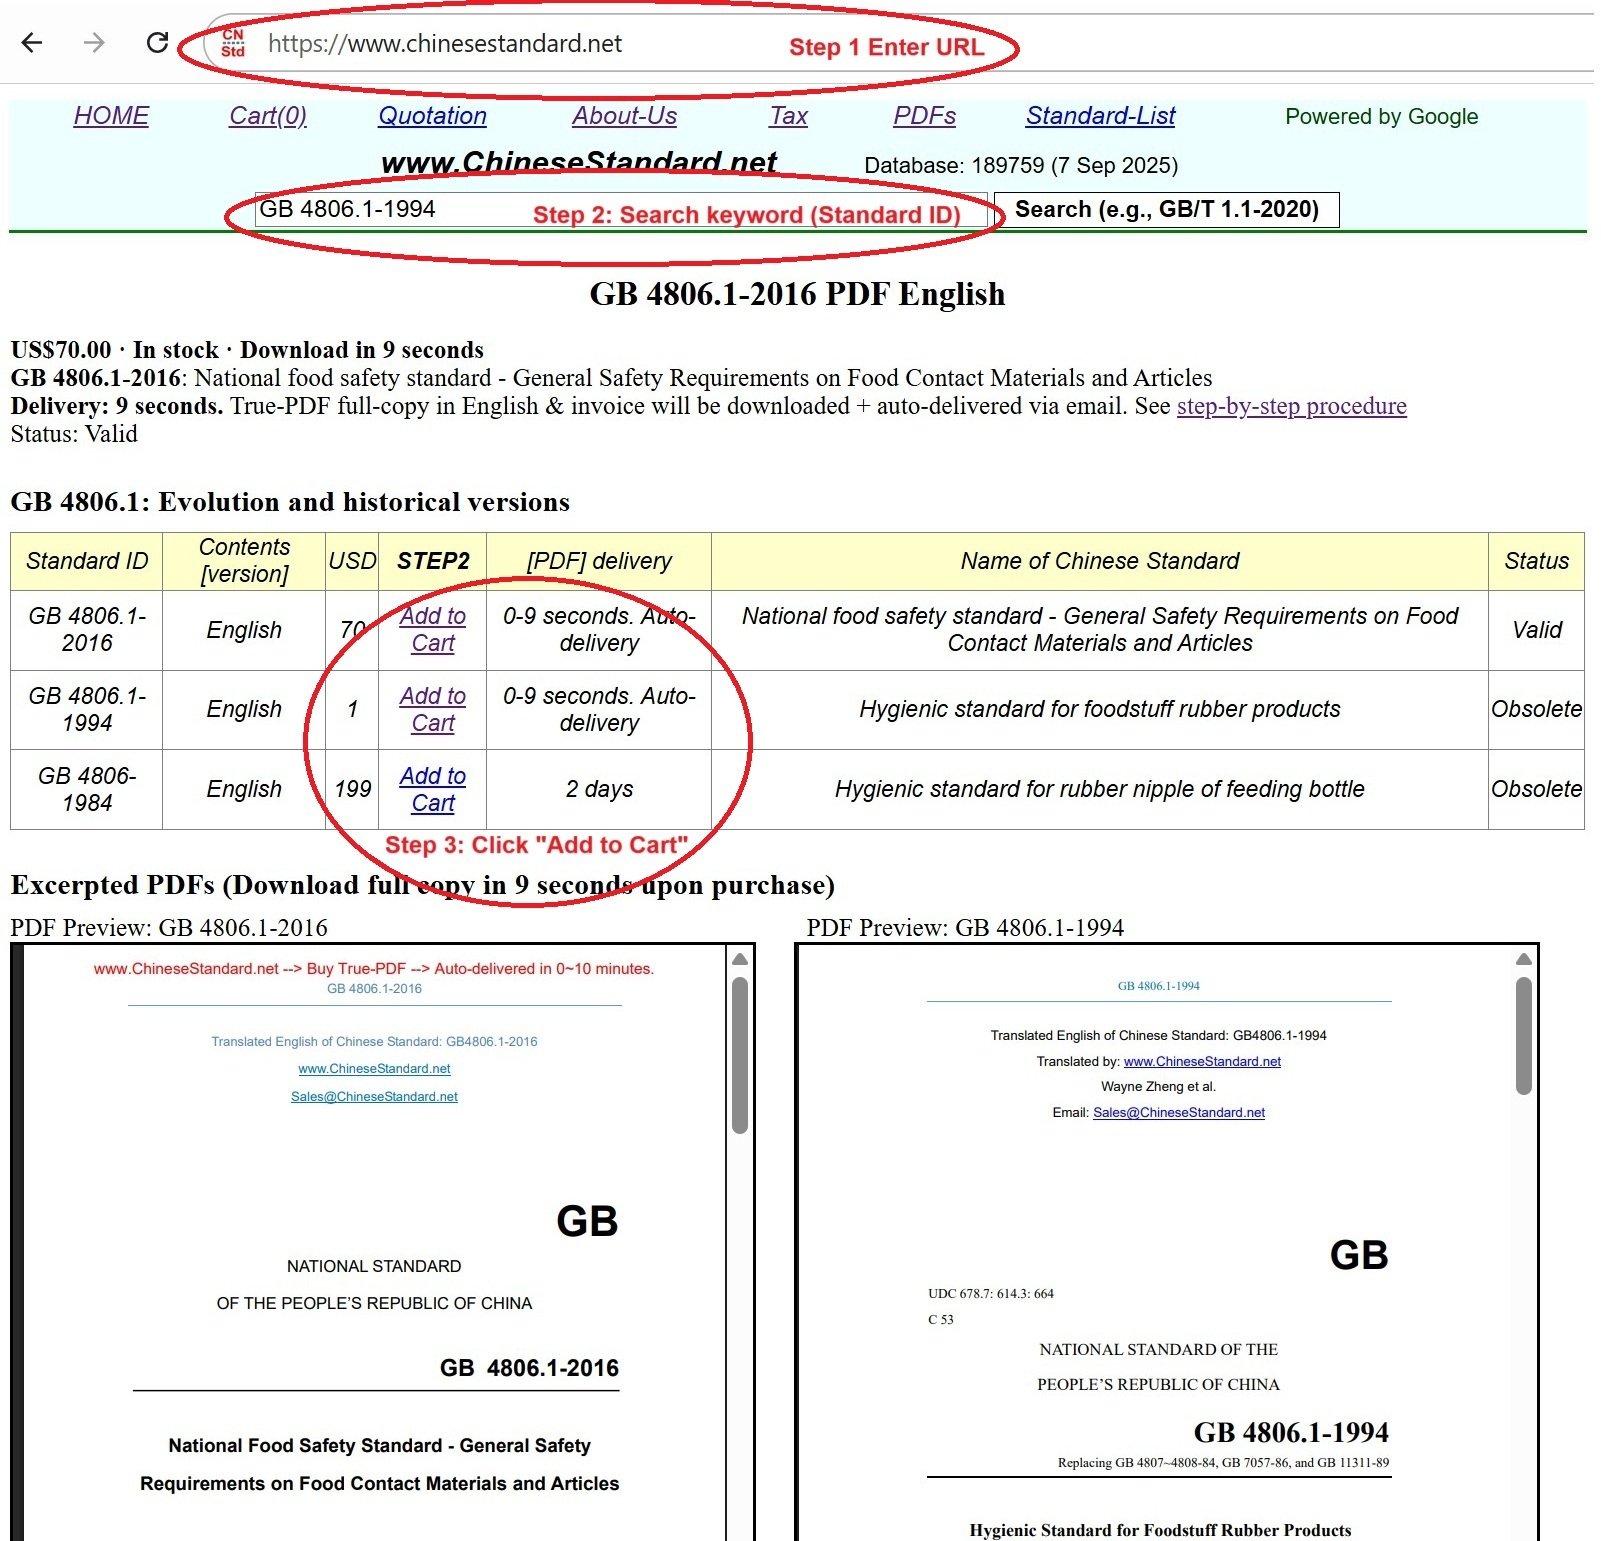
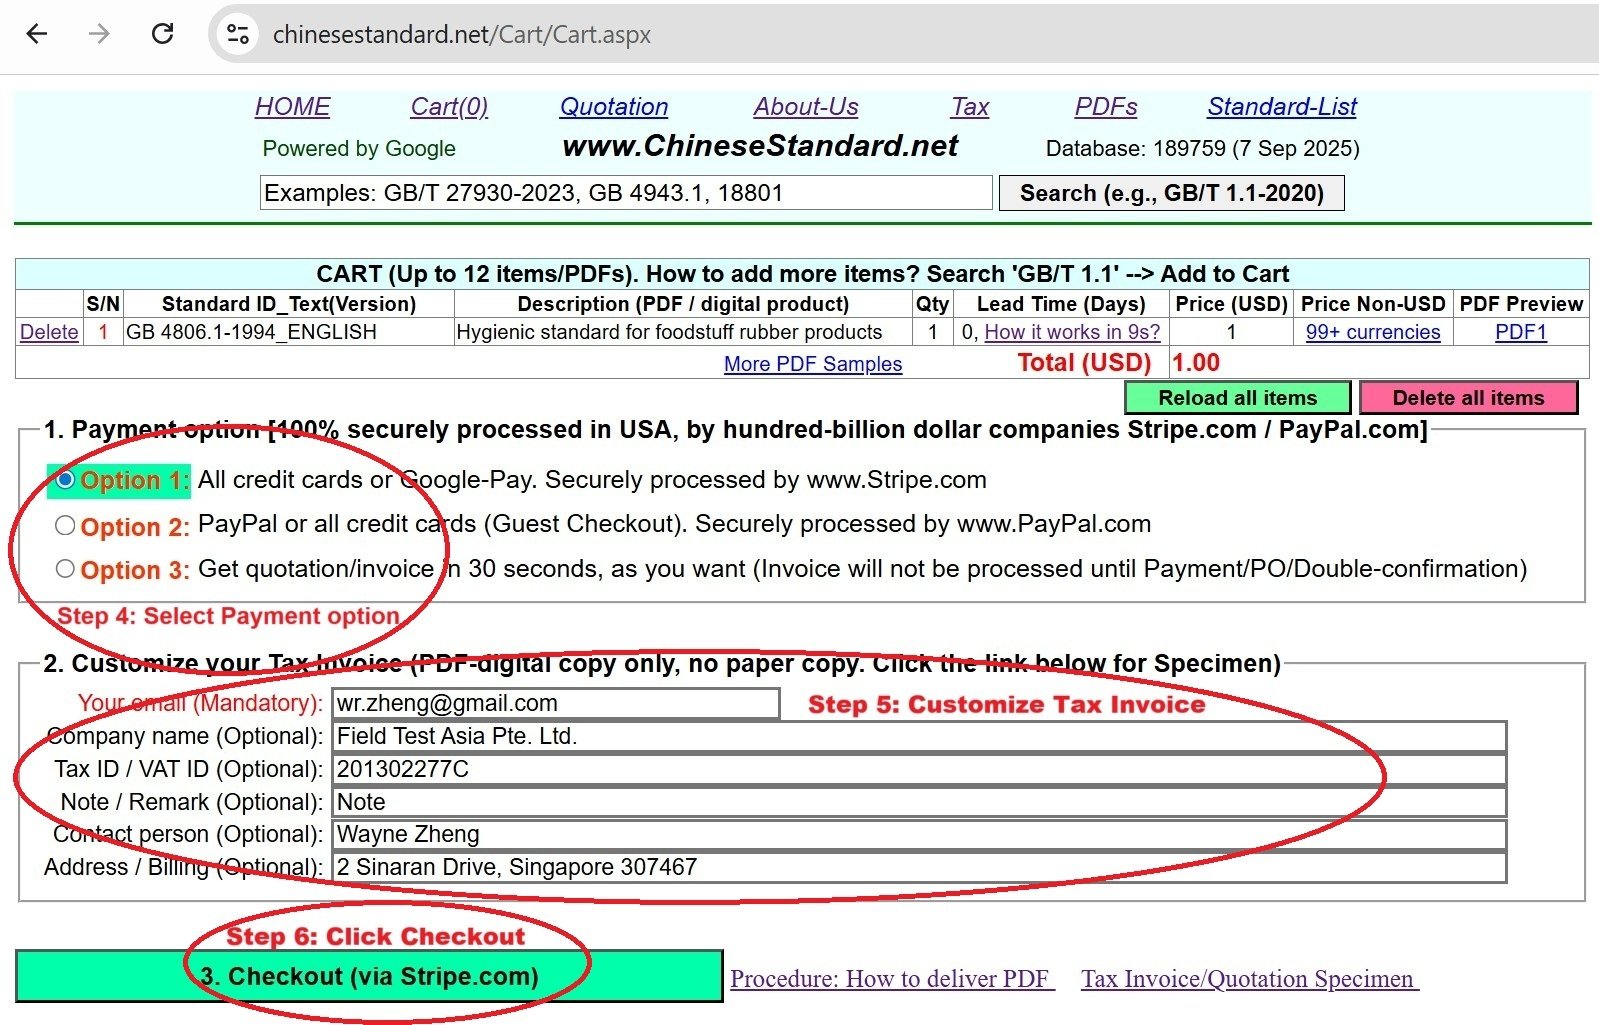
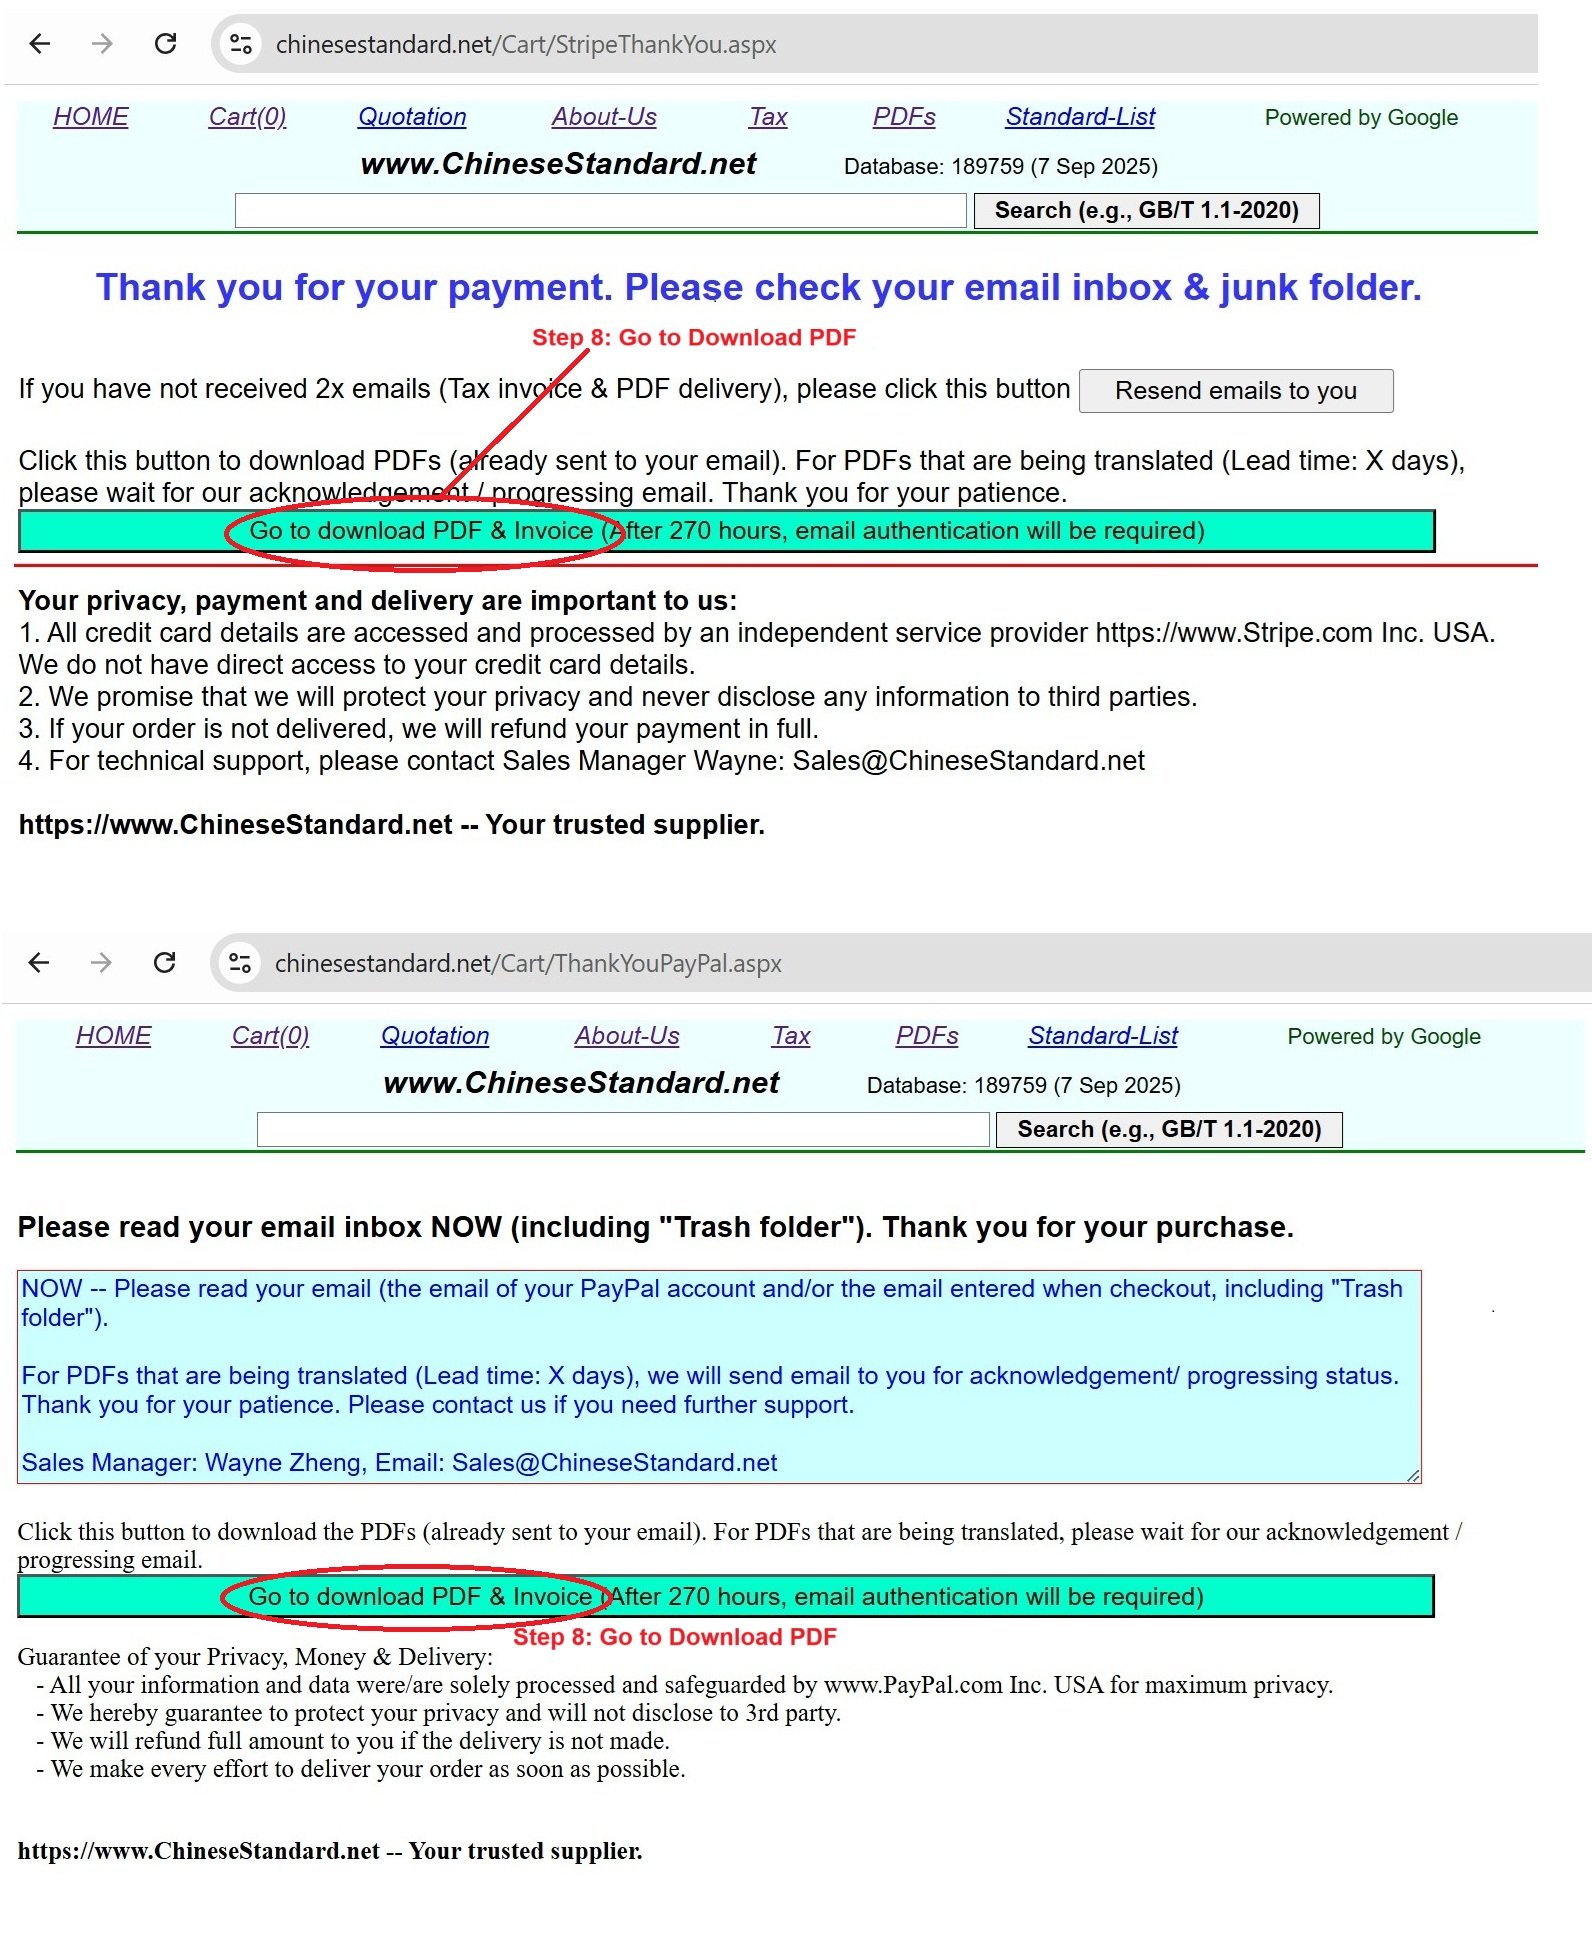
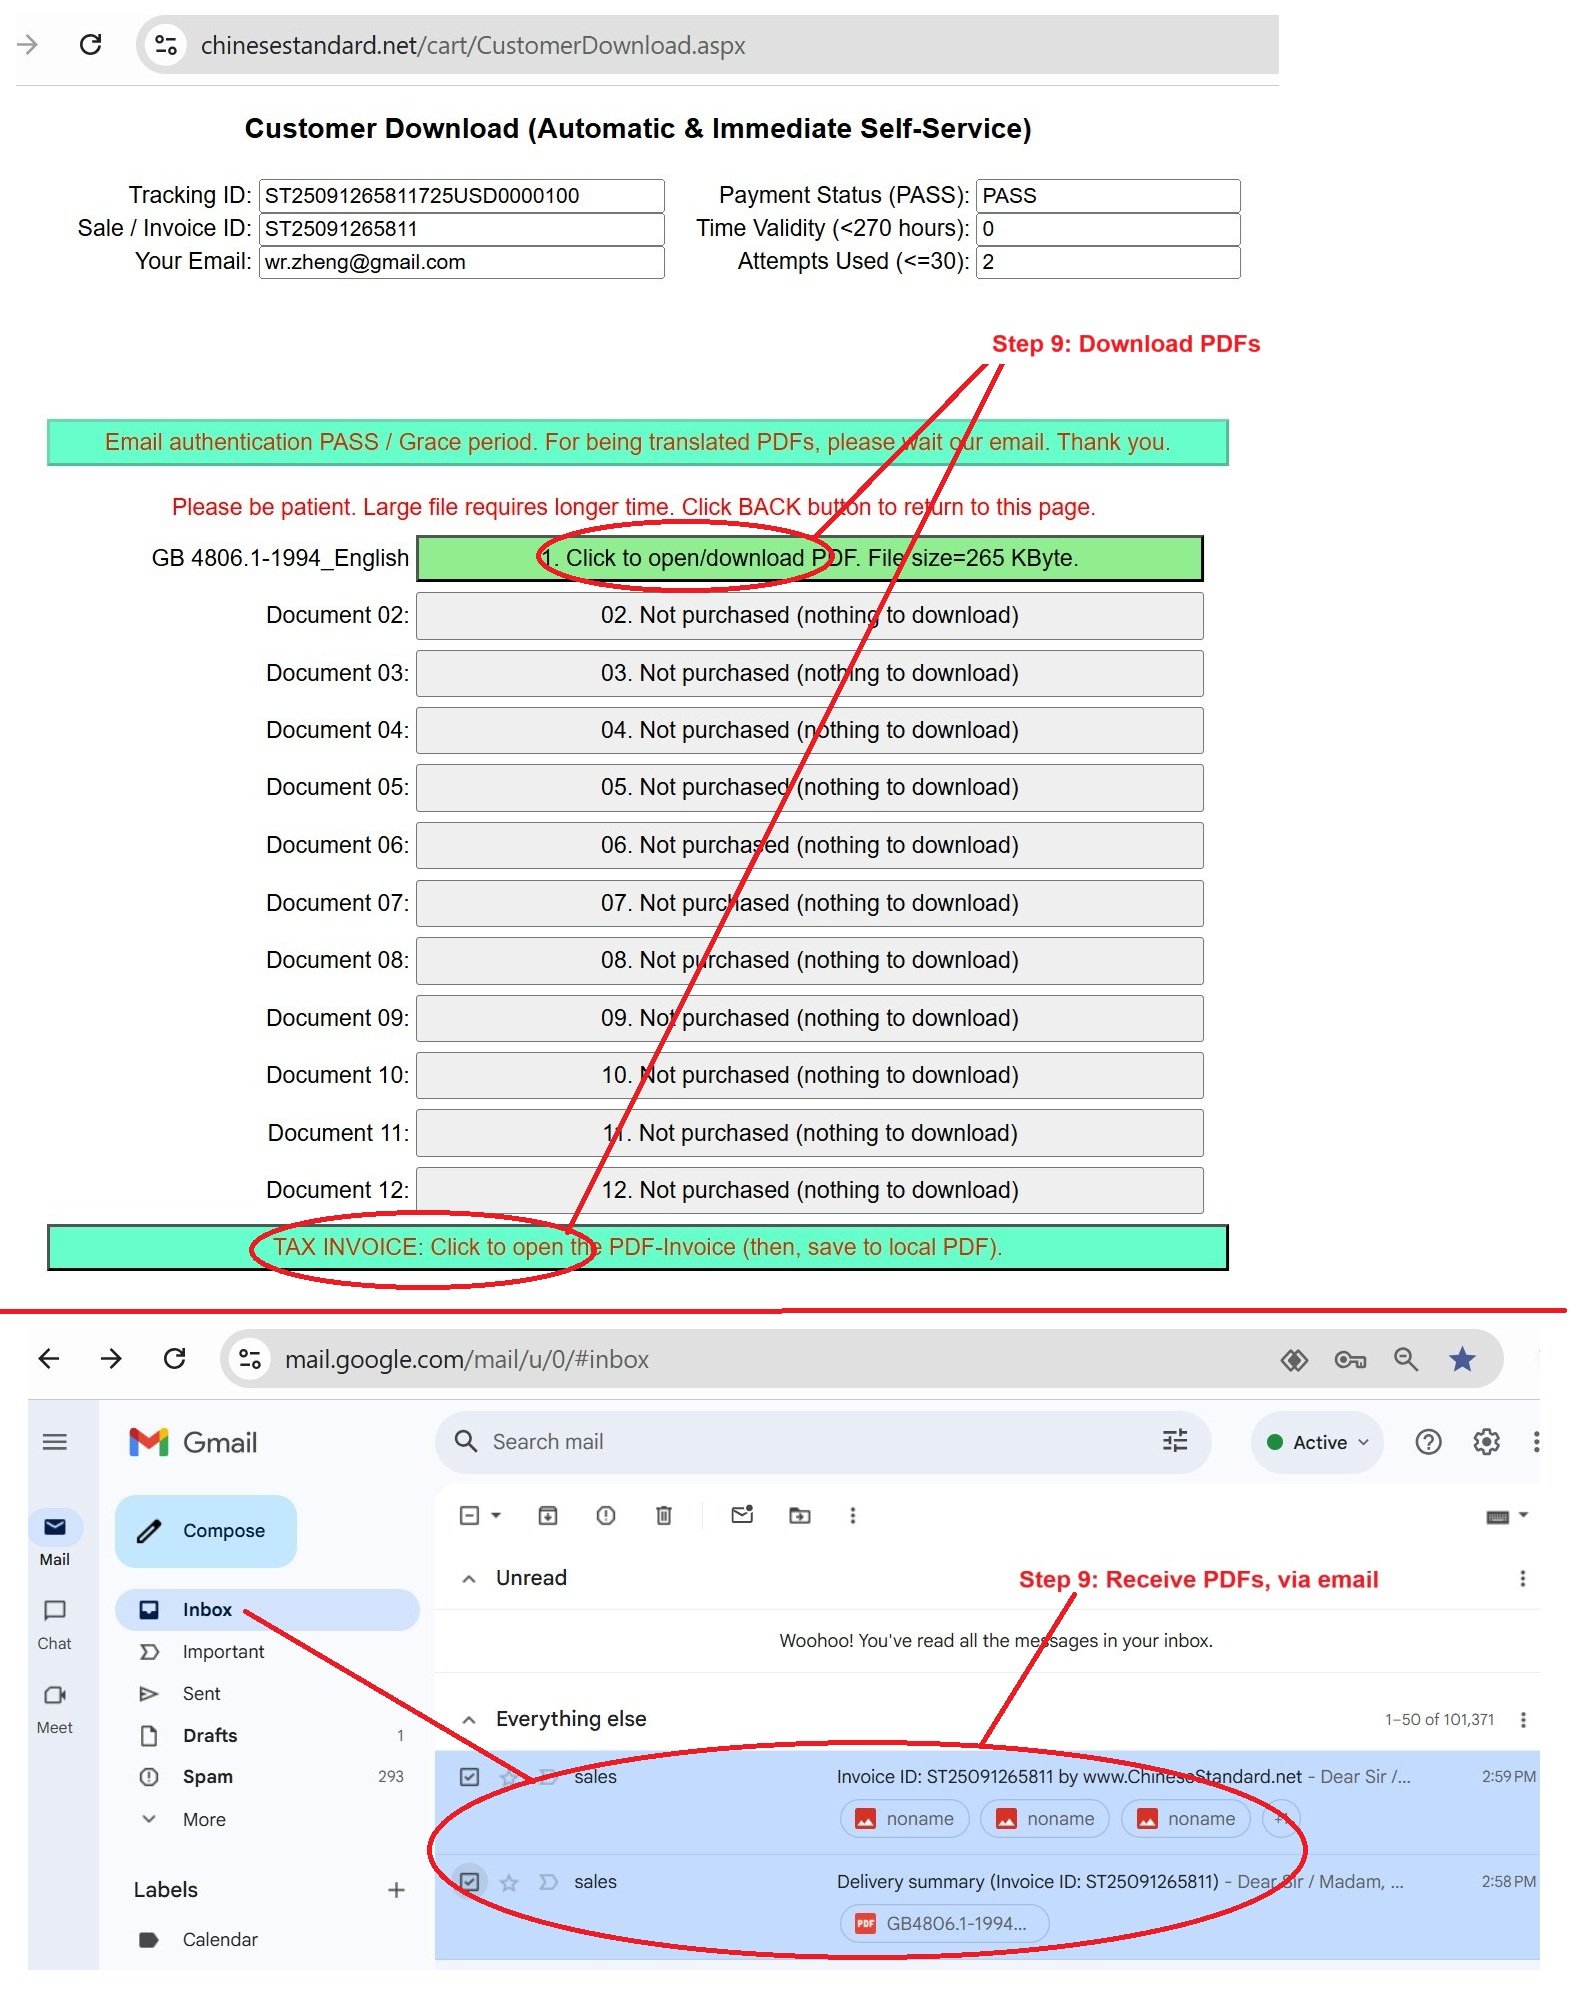
Similar standardsGB/T 13298-2015: Inspection Methods of Microstructure for Metals---This is an excerpt. Full copy of true-PDF in English version (including equations, symbols, images, flow-chart, tables, and figures etc.), auto-downloaded/delivered in 9 seconds, can be purchased online: https://www.ChineseStandard.net/PDF.aspx/GBT13298-2015GB NATIONAL STANDARD OF THE PEOPLE’S REPUBLIC OF CHINA ICS 77.040.99 H 24 GB/T 13298-2015 Replacing GB/T 13298-1991 Inspection Methods of Microstructure for Metals Issued on. SEPTEMBER 11, 2015 Implemented on. JUNE 1, 2016 Issued by. General Administration of Quality Supervision, Inspection and Quarantine; Standardization Administration of PRC. Table of ContentsForeword... 3 1 Scope... 5 2 Normative References... 5 3 Specimen Preparedness... 5 4 Specimen Grinding... 10 5 Specimen Polishing... 11 6 Microstructure Displaying... 12 7 Microstructure Inspection... 15 8 On-Site Metallographic Inspection... 18 9 Test Report... 18 Appendix A (Informative) Etchants Commonly Used by Metal... 191 ScopeThis Standard specifies the specimen preparedness, specimen grinding, specimen polishing, microstructure display, microstructure test, on-site metallographic and test records for the metal microstructure inspection. This Standard is applicable to the operation method of using metallographic microscope to inspect the metal structure.2 Normative ReferencesThe following documents are essential to the application of this document. For the dated documents, only the versions with the dates indicated are applicable to this document; for the undated documents, only the latest version (including all the amendments) are applicable to this document. YB/T 4377 Electrolytic Polishing Method of Metallographic Specimen3 Specimen Preparedness3.1 Specimen selection 3.1.1 General To ensure the effectiveness of inspection, the selected metallographic specimen shall represent the researched materials objectively and comprehensively as much as possible. The specimen cutting direction, location, quantity shall be determined by the metal manufacturing method, inspection purpose, relevant standards, and provisions of both parties’ agreement. 3.1.2 Routine inspection In addition to the special provisions in the product standard, it is recommended to select from the position that can represent the characteristics of the materials; the specimen shall contain the complete processing and impact area. For instance, the specimen of steel strip or wire is suitable to cut from the end of the coil; cast specimen shall contain the maximum and minimum segregation zones; heat treatment specimen shall contain complete heat treatment layer; surface treatment specimen shall contain all surface treatment layers; welding specimen shall contain weld seam, heat affected zone, and base metal. 3.1.3 Failure analysis The specimen shall be selected from the position of fracture or failure. Prior to cut the metallographic specimen, finish the research against the failure surface; or finish at least recording the failure situations. After that sampling from the normal position, and compare their structures and performances. 3.2 Inspection direction and selection of inspection surface4 Specimen Grinding4.1 Specimen planishing The cut specimen shall be firstly planished to make preparation for the next procedure of grinding of sand paper. When grinding, use water to cool off the specimen, prevent the changes of the specimen structure due to heating. 4.2 Specimen burnishing 4.2.1 Manual burnishing After planishing, cleaning, and drying, the specimen shall be ground successively on the different grain size of sand paper from coarse to fine; the sand paper shall be paved on the flat glass, metal or plate. Each time the sand paper is changed, the specimen shall rotate for 90° perpendicular to the old grinding mark; in such direction, burnish till the old grinding mark disappear totally, and the new grinding mark is uniform. 4.2.2 Burnishing of mechanical milling machine Place the sand paper and grinding plate of different grain size from coarse to fine on the mechanical milling machine, and grind successively.5 Specimen Polishing5.1 General Polish the grinding mark on the specimen to reach the mirror finish, and there are no grinding defects. The polishing method can take mechanical polishing, electrolytic polishing, chemical polishing, vibration polishing, micro-grinding and so on. 5.2 Mechanical polishing 5.2.1 Rough polishing After the burnishing of sand paper, the specimen can be transferred to the polishing machine equipped with nylon, woolen cloth or fine canvas to conduct rough polishing; the polishing agent can use the find-grained diamond, alumina, magnesia, chromic oxide, iron oxide, emery, and the like; 5.2.2 Precise polishing 5.3 Electrolytic polishing Electrolytic polishing indicates that take the metal as the anode inserted in the electrolytic cell; its surface generates selective corrosion due to the electrolytic reaction; so that it is a method to polish the surface. The conditions of electrolytic polishing depend on voltage, current, temperature and polishing time, and shall be implemented as per the provisions of YB/T 4377. 5.4 Chemical polishing Chemical polishing indicates the result that chemical reagents dissolve the uneven specimen surface, and make it gradually smooth. However, it can only make the specimen surface smooth rather than neat. It has good polishing effect against the pure metal of iron, aluminum, copper, silver and etc.. 5.5 Vibration polishing Vibration polishing indicates driven by the industrial power (after half-wave rectification), the spiral vibration system makes the specimen do the circular motion on the grinding disk; meanwhile, it rotates itself; so that the polishing purpose is achieved. It is commonly used to remove the stress or residual deformation layer on the specimen surface, finally obtain high-quality surface. 5.6 Microscopic grinding Microscopic grinding [Translator note. it should be Microscopic grinding machine] is made of replacing the microtome blade with grinding head. After the specimen is cut by the microtome, then it shall be ground by the microscopic grinding machine. Microscopic grinding combines the burnishing and polishing into one step.6 Microstructure Displaying6.1 General After polishing, the specimen microstructure shall be directly displayed without treatment; or use physical or chemical method to conduct special treatment against the specimen, so that various structures can appear good contrast, and display clearly. The common methods include optical method, etching method, and interference layer method. 6.2 Optical method Since different structures have different reflection intensity and colour against the light, which can be used to distinguish and display the metallographic microstructure. Specimen shall be observed without any other treatment; or use the polarized light differential interference and other accessories on the microscope to observe the specimen. 6.3 Etching method 6.3.1 Chemical etching The process that the chemical reagent and specimen surface occur chemical dissolution or electrochemical dissolution, so that display the metal microstructure. 6.3.2 Electrolytic etching Take specimen as the anode of the circuit, and immerse it into appropriate electrolytic etching solution, so that display the metal microstructure. The etching conditions depend on voltage, current, temperature, and time. 6.3.3 Constant potential etching Constant potential etching is further development of electrolytic etching; use potentiostat to ensure the constant potential of the anode specimen during the etching process; the etching (separate etching and successive etching) or coloring treatment can be selected against the specific phase of the structure according to its polarization conditions. 6.4 Interference layer method A thin film is formed on the polished surface of the metal specimen; through the multiple reflection and interference phenomena of the incident light, utilizing different optical constants and film thickness of the different phases, make good black-and-white and color contrast among structures, so that identify various metal phase. 6.4.1 Film forming method by chemical etching A method of forming a thin film on the metal specimen surface by using the chemical reagent. Different phases in the metal may form different-thickness thin film due to the different potential, so that make the various phases, orientations, different grains, sub- grains, dendrites generate different interference color and display the structure difference due to the multiple reflections and interference phenomena. It is commonly used for phase identification, grain phase observation, and segregation structure. 6.4.2 Anode film-coating method Anode film-coating method is the result of anodizing or anodizing treatment. In the anode region, the electrochemical anodic metal generates ionization reaction; and the metal ions in the solution of anode region react with pure chemical deposition of some anions; then form a thin film on the specimen surface that exhibits anisotropy to light. Under the polarized light, use differential interference or sensitive plate, grains with different orientations generate different colorful colours. Generally, pure aluminum, high-purity aluminum, soft aluminum alloy, and cast aluminum requires to take anode film-coating method, which shows clean grains under polarized light.7 Microstructure Inspection7.1 Microscope 7.1.1 The common illumination modes of metallurgical microscope include bright field, dark field, polarized light, differential interference contrast (DIC). 7.1.2 The microscope shall be installed in dry, ventilated, dust-free, vibration-free, non-corrosive atmosphere of chamber; and place on a stable table and/or base, preferably there is damping device nearby. 7.2 Microscopic observation 7.2.1 Generally, the total appearance of specimen shall be firstly observed at low magnification; then inspect at different magnification times as per the test purpose. According to the research requirements, observe in the following methods. 7.2.2 The lens selection depends on the desired magnification times (choose properly according to the instruction manual of the microscope). Generally, in order to fully use the resolution of microscope object lens, the effective magnification times shall not be greater than 1000× numerical aperture (N, A) of object lens; after that select proper eye lens to match the object lens, so that prevent the false magnification. 7.2.3 The light source shall be adjusted properly, the emitted light shall be stable and have sufficient intensity. Adjust the location of light source and concentration, so that the light beam can shoot into the center of vertical luminaire entrance; and obtain the uniform brightness of the obtained image. 7.2.4 The color filter depends on the type of object lens. If it is achromatic lens, use the yellow, green color filter; if it is wholly achromatic lens, use either yellow, green or blue color filter. The color of the color filter shall be consistent with the color of the phase need to be identify. 7.2.5 The specimen shall be placed on the microscope carrier stably; so its plane is perpendicular to the optical axis of the microscope. After that move the carrier, select the proper structure position on the specimen and adjust the microscope focal length, so that the image can be clear. 7.2.6 The aperture stop of the microscope shall be adjusted to proper size according to the microscope magnification times and microstructure; so that the image observed under the object lens can be clear and have good contrast. 7.2.7 The field stop of the microscope shall be adjusted to proper size; so that the bright range of the image is within the size range of picture; and obtain the optimal image contrast. 7.3 Image acquisition 7.3.1 The actual magnification proportion of image shall use micrometer to calibrate; for the microscope equipped with image analysis software, the system scale of the image analysis software shall be verified and calibrated regularly. The calibration of system scale can be carried out according to the instruction manual of the image analysis software. 7.4 Image analysis The acquired microstructure can be conducted microstructure analysist and quantitative metallographic analysis as required. 7.4.1 Microstructure analysis Usually, the following test and analysis can be carried out. 7.4.2 Quantitative metallographic analysis8 On-Site Metallographic InspectionWhen conducting the structure non-destructive test on the large parts or components like large gears, shafts, and pipes, the inspection point can be selected directly on the workpiece, then perform the burnishing, polishing, etching and other processes.9 Test ReportThe test report shall contain the following contents. a) Material name, grade, specification, batch number, number, thermal treatment process, sampling quantity, position and direction; b) This Standard number; c) Using instrument and model; d) Structure displaying method; if the etching method is adopted, indicate the type of etchant; e) Test results; f) Report date and number; g) Signature of inspector and auditor. ......Source: Above contents are excerpted from the full-copy PDF -- translated/reviewed by: www.ChineseStandard.net / Wayne Zheng et al. Tips & Frequently Asked Questions:Question 1: How long will the true-PDF of English version of GB/T 13298-2015 be delivered?Answer: The full copy PDF of English version of GB/T 13298-2015 can be downloaded in 9 seconds, and it will also be emailed to you in 9 seconds (double mechanisms to ensure the delivery reliably), with PDF-invoice.Question 2: Can I share the purchased PDF of GB/T 13298-2015_English with my colleagues?Answer: Yes. The purchased PDF of GB/T 13298-2015_English will be deemed to be sold to your employer/organization who actually paid for it, including your colleagues and your employer's intranet.Question 3: Does the price include tax/VAT?Answer: Yes. Our tax invoice, downloaded/delivered in 9 seconds, includes all tax/VAT and complies with 100+ countries' tax regulations (tax exempted in 100+ countries) -- See Avoidance of Double Taxation Agreements (DTAs): List of DTAs signed between Singapore and 100+ countriesQuestion 4: Do you accept my currency other than USD?Answer: Yes. www.ChineseStandard.us -- GB/T 13298-2015 -- Click this link and select your country/currency to pay, the exact amount in your currency will be printed on the invoice. Full PDF will also be downloaded/emailed in 9 seconds.Question 5: Should I purchase the latest version GB/T 13298-2015?Answer: Yes. Unless special scenarios such as technical constraints or academic study, you should always prioritize to purchase the latest version GB/T 13298-2015 even if the enforcement date is in future. Complying with the latest version means that, by default, it also complies with all the earlier versions, technically.How to buy and download a true PDF of English version of GB/T 13298-2015?A step-by-step guide to download PDF of GB/T 13298-2015_EnglishStep 1: Visit website https://www.ChineseStandard.net (Pay in USD), or https://www.ChineseStandard.us (Pay in any currencies such as Euro, KRW, JPY, AUD).Step 2: Search keyword "GB/T 13298-2015". Step 3: Click "Add to Cart". If multiple PDFs are required, repeat steps 2 and 3 to add up to 12 PDFs to cart. Step 4: Select payment option (Via payment agents Stripe or PayPal). Step 5: Customize Tax Invoice -- Fill up your email etc. Step 6: Click "Checkout". Step 7: Make payment by credit card, PayPal, Google Pay etc. After the payment is completed and in 9 seconds, you will receive 2 emails attached with the purchased PDFs and PDF-invoice, respectively. Step 8: Optional -- Go to download PDF. Step 9: Optional -- Click Open/Download PDF to download PDFs and invoice. See screenshots for above steps: Steps 1~3 Steps 4~6 Step 7 Step 8 Step 9 |